Blocks and Block Palette
Now that you’re well aware of the stage, sprite, and their palettes, it is now time to take out the blocks and the palettes and set the table.
What is a Block?
You might ask ‘But, what is a block? How am I supposed to take it out if I don’t know what it is in the first place?’
Well yeah, you’ve got a point there.
A block is like a jigsaw puzzle piece using which you can create your own projects, i.e. write programs/codes. Since they are like puzzle pieces, blocks have slots in them, and they fit into each other, which makes programming an easy-peasy task. The advantage of learning programming using blocks is that there is no room left for typing errors (known as syntax errors), and you can give your undivided attention to the problem and figuring out its solution; this helps immensely in developing problem-solving skills and makes learning programming in other languages child’s play. Yay!
Now you know what blocks are. But where to find them? You guessed it right! In the block palette. The block palette takes up the area in the center. At the top, you’ll find three tabs:
- The first tab is the Code tab.
- The third is the Sounds tab.
- The second tab is a bit changeable: when you select a backdrop (a stage background), it changes to Backdrops; when you select a sprite, it changes to Costumes (you can try if you like! First select the current backdrop in the stage palette, and then select the current sprite in the sprite palette.). This tab is for modifying/enhancing the appearance of the selected item, be it either the backdrop or the sprite (Hey, everybody likes being beautiful!)


For now, let’s shift our focus to the Code tab. This tab is what you’ll be using the most because it is here that you’ll find all the blocks you’ll be using for writing programs.
Under the Code tab, you’ll see different palettes with a name and color assigned to each palette. Each palette has different blocks in it. The name of each palette signifies the type of function the blocks under that palette will perform; e.g. the blocks under the Motion palette will perform functions related to motion, or movement, like move ()steps, turn ()degrees, point in direction(), etc. The color will help you recognize what type of block it is, and find related blocks easily. Let’s dig a bit deeper into the palettes now.
| Block Category | Color | Function |
|---|---|---|
| Motion Block | Medium Blue | To control sprite's movement |
| Looks Block | Violet | To control sprite's appearance |
| Sound Block | Light Purple | To play sound. Explore Sounds tab to record, upload a music or edit sounds. |
| Control Block | Burnt Orange | To control the flow of script (using conditions) |
| Event Block | Occur Yellow | To sense events, which trigger scripts to run. These are essential for every project |
| Sensing Block | Light Blue | To detect different factors of a project |
| Operator Block | Light Green | To do math calculations and handle strings |
| Variables Block (Data Block) | Orange | To hold values and string in variables and display them on the screen |
| My Blocks | Light Pink | To make custom blocks |
Let’s start Tinkering
Since you now know what palettes are, and what they do, let’s tinker a bit with them.
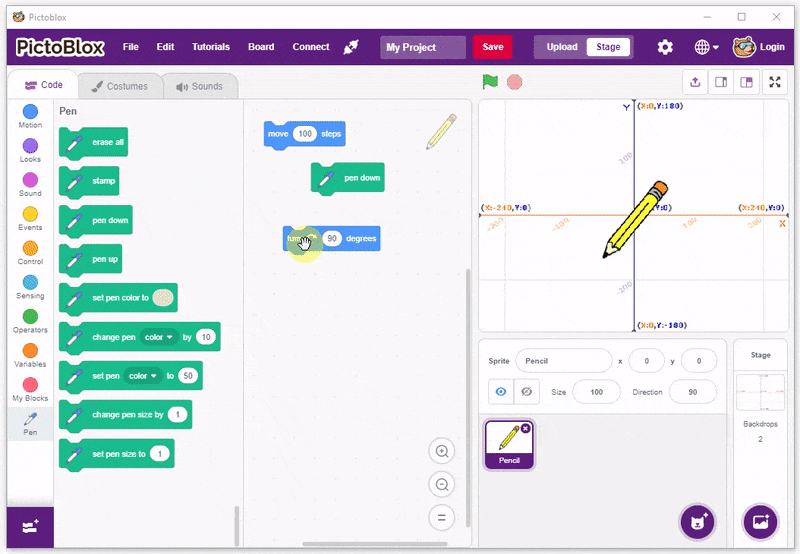
- Click on the Motion palette and bring the move () steps block to the Scripting Area. To bring the block, click on the block, and hold. Then drag it to the Scripting Area and release. Now click on this block.

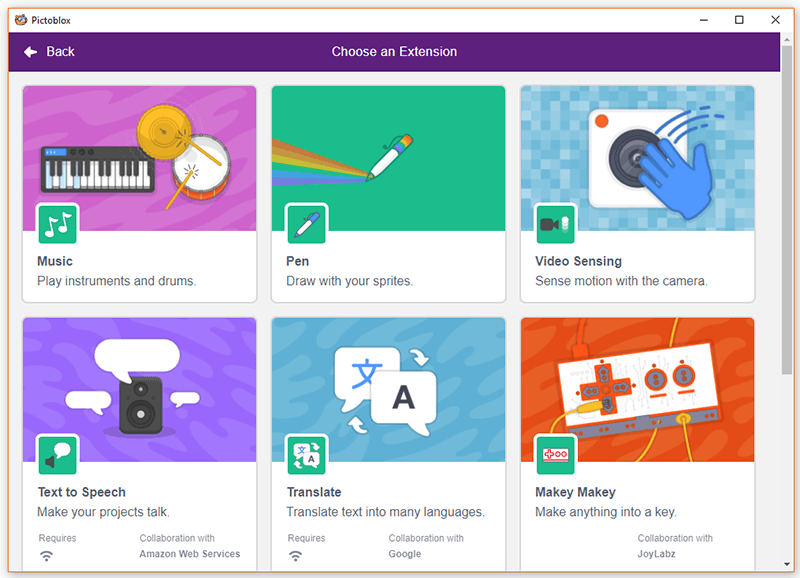
What do you observe? Exactly. The pencil moves towards the right, but it doesn’t draw anything. So, what do we do about it? Follow the next step! - Click on add extension on the bottom left side. A new window will open showing all the extensions. Click on Pen extension.

- The Pen palette will appear, drag and release the pen down block anywhere in the Scripting Area, and then click on it. Now, click on the move () steps block.

What do you see now? What? Still nothing? No, there’s nothing wrong with the pencil. Observe carefully the number of steps the pencil moves. That number is equal to the number of pixels on the screen. And 10 is extremely small. Therefore, we need to increase the number. Change the number to 100. Now, click on the move () steps block. You’ll be able to see the line now!
Till now, the pencil has been moving only towards the right; let’s now make it explore different directions. - Click on the Motion palette. Then, drag and drop the turn ‘clockwise’ () degrees block anywhere in the scripting area, change the number in the bubble to ‘90’, and click on it.

What did you see now? Yes! The pencil’s tip now points towards the top-left corner, i.e. it has turned by 90° in the clockwise direction.
Go ahead and put on your artist’s cap and create new art pieces. Who knows, you might become the first ‘programartist’!