Script
Clearing The Stage
Let’s try a different appetizer now. Let’s try making a square. Here, other than the pen down and move () steps blocks we’ll also use:
![]()
As much as you like keeping your stuff around you, visible to you all the time, it would be better if you cleared the stage before beginning anything new (sounds familiar? Like, *ahem* something mum always says on seeing *ahem* the state of your room?). For this, go to the Pen palette and drag and drop the erase all block anywhere in the scripting area and click on it.

Making a Square using Script
Et voila! The stage becomes as good as new! Let’s start making the square!
- Go to the Pen palette and drag and drop the pen down the block. Then, click on it.
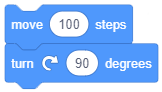
- Go to the Motion palette and drag and drop the turn ‘clockwise’ () degrees block below the move () steps, and in place of 15 write 90.
- Click on these two blocks. You’ll see that the pencil has drawn a line and then turned by 90°. Now click on it again. Now, you’ll observe that the pencil has drawn a line in the downward direction and again turned by 90°; its tip now points towards the top right corner of the stage. Repeat this step two more times.

At the end of step 2, you’ll have a nice square drawn. But, it was quite a task! You had to click four times to make the square. What if there was a different way, which required a lesser number of clicks? Maybe just one?
Great news! There exists a method, using which you can draw a square and you’ll need to click it only ONCE. This method is called writing a script. A script is a series of blocks attached one below the other that make a program together (and not the dialogues of a movie). You need to click on the script once and all the blocks will be executed in the order they are placed. Let’s begin writing the script.
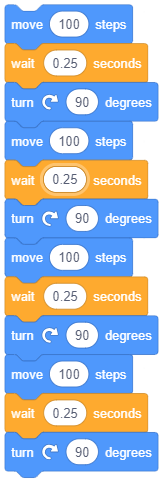
- Right click on the two blocks you joined before and select duplicate. You’ll observe that the two blocks have been copied.
- Attach the copy of the blocks below turn ‘clockwise’ () degrees block.
- Repeat steps 1 and 2 two more times.
- At the end of step 3, what you’ve created is a script. Now click on the script.


What wizardry is this?! The pencil didn’t even move, and a square has magically appeared! Just kidding! The pencil did move, but it was extremely fast for us to notice. To watch the pencil move, you’ll need to add a wait () secs block below every move () steps block in the script. The wait () secs block is present in the Control palette.
Now when you click on the modified script, you’ll be able to see the pencil moving and drawing side of the square on by one.
The Magic Ingredient
The script you wrote contains the same blocks repeated again and again; it takes up unnecessary space in the scripting area. What if there was something that eliminated this problem and saved the space?
You’re one of those lucky kids with whom we’re sharing the secret magic ingredient that’ll help us in making the script short and saving the space in the scripting area. Come in *drum roll* the repeat block.
The repeat block is a C shaped block present in the Control palette. Also known as ‘Wrap blocks’, C shaped blocks loop the blocks within the ‘C’. You can place as many blocks as you want, or an entire script inside it. As the name suggests, it repeats the blocks or the script inside it as many times as the number written in its bubble (refer the figure above). E.g. if the number is written is ‘10’, then the repeat block will repeat the blocks or the script inside it 10 times.
Let’s rewrite the script using the repeat block:
- First of all,click on the erase all block.
- Next, go to the Pen palette and drag and drop the pen down block in the scripting area.
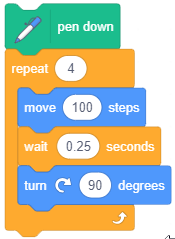
- From the Control palette drag and drop the repeat block below the pen down block. Change the number in the block to 4 (We want to draw a square. Hence, we need to move and turn the pencil four times).
- Now, place the move () steps block inside the repeat block.
- Place the wait () secs block and the turn ‘clockwise’ () degrees block below the move()steps block.
- Finally, click on the script.
Miracle! Just one click, no repetition of blocks, no extra space, and the pencil draw the square flawlessly!
Save Yourself The Hassle
You’ve mastered the different ways of drawing a square (give yourself a pat on the back for that!). however, one teeny tiny bit remains. Every time you want to run the script, you must click on it. How about removing this bit, and introducing another block, that would save you the hassle?
Introducing the when () key pressed block. It is a hat block, present in the Event palette. A hat block, in general, is for starting a script. Unlike other blocks, you can only place a block below it. Let’s use this block to start our script.
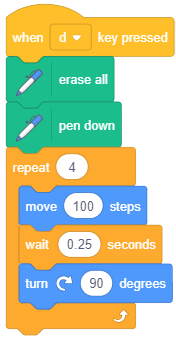
- Drag and drop the when () key pressed block in the scripting area.
- Drag and place the entire script below the when () key pressed block. From the drop-down menu select the d key.
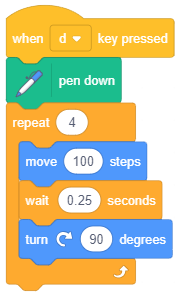
Now, the script will run, and the pencil will draw a square whenever you press the d key on the keyboard. Don’t forget to click on the erase all block!
Bonus Step
Place the erase all block below the when () key pressed block; then place the script below the erase all block. This way, you don’t have to clear the stage every time you want to run the script; the new script will clean it itself (Only if something like this existed in the real world!).